
WebPal accounts and restricted user access
WebPal is a multi-user content management system, i.e. it allows for an administrative user to add additional users to the system and grant access priviledges on a per-chapter level.
Step 1: Adding a User
To add a user to WebPal, make sure you fetch the access node when opening the web document.
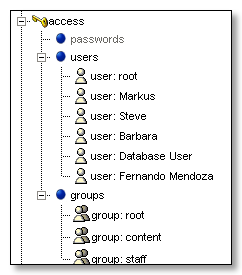
Under users, insert the additional user node. A dialog will ask you for relevant information, such as login name, full name and email address. Please fill in each field, and press OK.
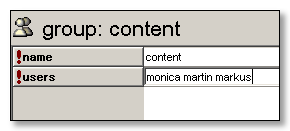
You can also group users to grant or deny access to the entire group at once. To associate a user with a certain group, add the username (that is, the login name, not the full name) to the group:
Note: the root group has a special meaning. Every user in the root group has implicitly read and write access to every node in the web. Make sure you only add users to this group if it is necessary.
Step 2: Granting Priviledges
Every chapter node has read and write (R/W) priviledges associated with it. You can grant or deny these priviledges at user-level or at group-level.
Open a chapter you would like to change access priviledges to. Click on the attributes tab. There are two fields, useraccess and groupaccess.
In each field, you may enter a list of users or group names, repectively, each looking similar to:
user:rw (grant full access)
user:r (grant read-only access)
user:none (deny access)
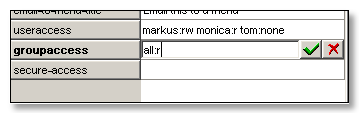
Note: the all group has a special meaning in that it implies all users not listed already under useraccess. In the example above, markus has full access, monica has read-only access, and tom has no access at all, and all other users have read access.